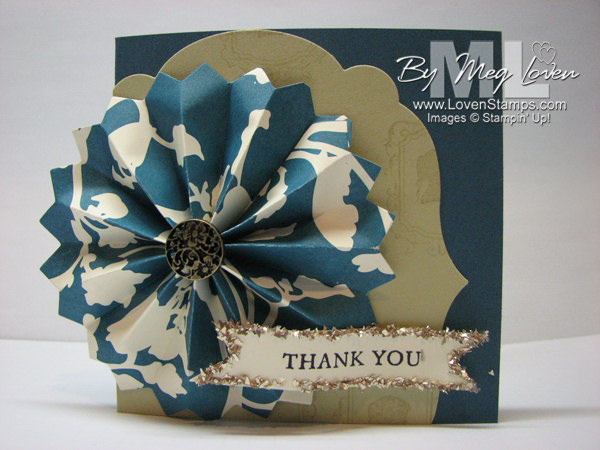
Okay, I love my Simply Scoring Tool for all kind of projects, but when it comes to making Rosettes, I am completely in LOVE with the new Designer Rosette Die for the Big Shot!
Here’s a project I created for my current Stamps in the Mail Club Round, using the Timeless Portrait Designer Series Paper and the Forever Young stamp set, plus the sweet single stamp, Elegant Thank You. The background shape is cut with the new Framelits Labels Collection.
The first time I put Designer Series Paper in this die, then folded the scores and ended up with a rosette in about 1.5 minutes… oh, I was in HEAVEN! Really, I think I did a little dance in front of my Big Shot to express my happiness.
Here are my tips for the Designer Rosette Die (see it online):
 For DSP, using the Extended Premium Crease Pad (see it online) on top instead of the top Cutting Plate was perfect. My crease lines were crisp enough to fold easily, and no white paper core showed through when I folded them.
- I did this small medallion with a 1.75 x 12″ strip of DSP — only one strip was needed. The score lines are a little further than 1/4″ apart, so it has a slightly different look than the 1/4″ Simply Scored rosettes.
- To attach the ends of the paper strip, I used Green-Lid Glue (aka Multipurpose Liquid Glue — see it online).
- To flatten the medallion and hold it in place, I used the Green-Lid Glue again. The trick is that the medallion isn’t quite flat on top, so I held the medallion down to make the back flat on my project (or on a punched backing circle) for a minute or two until the glue set. Since the medallion isn’t quite flat on top, it doesn’t work to set a book on top to hold it down til the glue sets. Make sense?
 I love that the die has a zig-zag on one edge, and a scallop on the other. That way you can cut a strip with either decoration, or just put your strip across the middle to make the ends plain. Just be sure to make the strip exactly straight across, or the folds won’t cooperate when you try to assemble the rosette. In fact, it’s probably more reliable to cut a full 5″ strip and then trim it into 3 pieces. But still — love the edge choices!
Eek! Okay, just writing about this, I’m getting excited about making more rosettes :)
You might want to know about sizes for the finished Rosettes, too. Here’s the range that I found:
- Use 3 full strips of DSP (5 x 12″ each) — finished rosette is 11-3/4″ wide. Perfect for home decor or a really big scrapbook page background.
- Use a single strip of DSP (1-3/4 x 12″) — finished rosette is nearly 4″ wide.
- Use a single strip of DSP (1-1/2 x 12″) — finished rosette is about 3″ wide.
Have fun with these, and watch for my upcoming Video Tutorial! And be sure to check out more of my Occasions Mini Catalog project ideas.
Happy Stamping!


Comments are closed.