
Last week I showed off the Scenic Coast Designer Series Paper with all the beautiful shimmering sunsets. Today’s project brings the sunset into YOUR hands with the options to create custom color and add a touch of glitter with the Shimmery White Embossing Paste. There’s no way we’re leaving it plain though – the ombre inking technique is a beautiful way to add bright colors to suit your occasion.


Be sure to keep the Sunset Coast stamp and die bundle handy for making the background mask as well as the overlay silhouette die cut frame. Plus the greetings included are perfect for cards meant to celebrate those who are sailing on to a new chapter. Graduations, retirements – tis the season for pretty cards and summer pursuits.

The steps for making Ombre Embossing Paste sunsets are pretty simple.
Ombre Embossing Paste: Technique Tutorial
Ombre is a French term meaning shaded, usually a multicolor stripe, where colors graduate from light to dark. In the context of embossing paste, it involves creating a gradient effect with the paste, which can add a unique dimension and depth to your art.
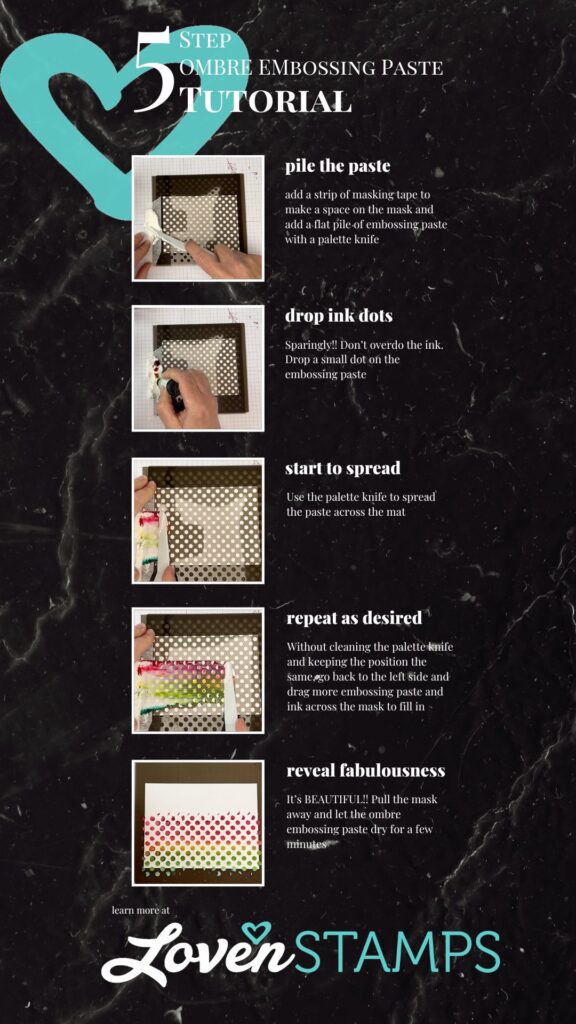
Step 1: Pile the Paste
The first step in the process is to add a strip of masking tape to make a space on the mask. Then, using a palette knife, add a flat pile of embossing paste. This is the basis for your work, so make sure it’s evenly spread and ready for the next steps.
Step 2: Drop Ink Dots
Next, you’ll want to add some color to your paste. But remember – use the ink sparingly! Don’t overdo it. Drop a small dot on the embossing paste. The color will spread and blend as you work with the paste, creating a striking ombre effect.
Step 3: Start to Spread
Once you’ve dropped the ink onto the paste, use your palette knife to spread the paste across the mat. The goal here is to distribute the color and create a gradient effect. The key to achieving a smooth ombre transition is to spread the paste evenly, making sure the color blends naturally.
Step 4: Repeat as Desired
Without cleaning the palette knife and keeping the position the same, go back to the left side and drag more embossing paste and ink across the mask to fill in. Be sure to spread only across – you don’t want to mix the colors with each other. The repeating process will help to enhance the ombre effect and ensure that the color is evenly distributed throughout the paste.
Step 5: Reveal Fabulousness
Finally, it’s time to reveal your masterpiece! Carefully pull the mask away and let the ombre embossing paste dry for a few minutes. The result will be a beautiful piece of art with a stunning gradient effect. It’s a simple and fun process, but with impressive results.

Art is all about experimentation and creativity. With this tutorial, you can explore new techniques and create beautiful, unique pieces. Whether you’re a seasoned artist or a beginner, embossing paste offers a fun and accessible way to express your creativity. So why not give it a try and see where your imagination takes you?
Today’s card is one of my LovenStamps Monthly Tutorials for May – and the printable PDF for all 4 projects is available as my free gift to you for placing an order in my online store during May. You already have the video tutorial – but the printable directions and photos are so handy to keep track of all the projects you’re planning to make. Each month I create a new set of 4 tutorials. And if you miss any, they’re always available after the month through my LovenStamps Card Mart Etsy shop.
Don’t forget that the best way to get all the pretty new papers (79 of them!) is to sign up for my LovenStamps DSP share. It would cost 8x more to get all the packs of new paper in your own hands, so the share is a great way to check out and determine your favorites. You never know – you might be surprised!

TWO SHARES LEFT for sign-ups!! Get your LovenStamps Designer Series Paper Share for the upcoming 2026 May-August Stampin’ Up! Catalog. 79 NEW Papers plus 65 Ready-To-Stamp Card Bases, including 14 new Specialty Shimmer, Velveteen, Pearlized and Luxe White papers! Reserve your spot: https://bit.ly/DSPsummer26
Be sure to grab a sneak peek at the upcoming Silly Old Bear Suite Escape Class — your first chance to get on my list! Registration for the class is open NOW, payments are due asap and kits will ship in mid-May. But for the best chance at getting your supplies, be sure to sign up for the class kit today!
Get details for Meg’s Silly Old Bear Suite Escape Class

Looking for printable PDF tutorials with MORE ideas for projects? Visit my LovenStampsCardMart Etsy shop and you can download and print the details for fabulous inspiration. See all the tutorials available: https://www.etsy.com/shop/LovenStampsCardMart
Sunset Ombre Embossing Paste – Stampin’ Up! Tutorial
View below or use the link to view directly on my LovenStamps YouTube channel. Don’t forget to subscribe while you’re there
Add items to your cart and be sure you’re shopping with me – Meg Loven to earn Stampin’ Rewards AND LovenStamps Perks Points and Tutorials.
Scenic Coast Suite Collection – Stampin’ Up! Supplies you’ll want for stamping at home:
Use Meg’s one-click link for Stamping Supplies for the full supply list or use the links below:
Product List![Scenic Coast Suite Collection (English) [ 167786 ]](https://assets1.tamsnetwork.com/images/EC042017NF/167786s.jpg "Scenic Coast Suite Collection (English) [ 167786 ]")
![Sunset Coast Bundle (English) [ 167781 ]](https://assets1.tamsnetwork.com/images/EC042017NF/167781s.jpg "Sunset Coast Bundle (English) [ 167781 ]")
![Scenic Coast 6" X 6" (15.2 X 15.2 Cm) Specialty Designer Series Paper [ 167773 ]](https://assets1.tamsnetwork.com/images/EC042017NF/167773s.jpg "Scenic Coast 6\" X 6\" (15.2 X 15.2 Cm) Specialty Designer Series Paper [ 167773 ]")
![Sunset Shimmer Vellum 12" X 12" (30.5 X 30.5 Cm) Specialty Paper [ 167784 ]](https://assets1.tamsnetwork.com/images/EC042017NF/167784s.jpg "Sunset Shimmer Vellum 12\" X 12\" (30.5 X 30.5 Cm) Specialty Paper [ 167784 ]")
![Sunset Sparkle Sequins [ 167785 ]](https://assets1.tamsnetwork.com/images/EC042017NF/167785s.jpg "Sunset Sparkle Sequins [ 167785 ]")
![Stylish Shapes Dies [ 159183 ]](https://assets1.tamsnetwork.com/images/EC042017NF/159183s.jpg "Stylish Shapes Dies [ 159183 ]")
![Blueberry Bushel Classic Stampin' Pad [ 147138 ]](https://assets1.tamsnetwork.com/images/EC042017NF/147138s.jpg "Blueberry Bushel Classic Stampin' Pad [ 147138 ]")
![Timid Tiger Classic Stampin' Pad [ 165278 ]](https://assets1.tamsnetwork.com/images/EC042017NF/165278s.jpg "Timid Tiger Classic Stampin' Pad [ 165278 ]")
![Crisp Cantaloupe Classic Stampin Pad [ 167680 ]](https://assets1.tamsnetwork.com/images/EC042017NF/167680s.jpg "Crisp Cantaloupe Classic Stampin Pad [ 167680 ]")
![Gorgeous Grape Classic Stampin' Pad [ 147099 ]](https://assets1.tamsnetwork.com/images/EC042017NF/147099s.jpg "Gorgeous Grape Classic Stampin' Pad [ 147099 ]")
![Crisp Cantaloupe 8 1/2" X 11" Cardstock [ 167693 ]](https://assets1.tamsnetwork.com/images/EC042017NF/167693s.jpg "Crisp Cantaloupe 8 1/2\" X 11\" Cardstock [ 167693 ]")
![Timid Tiger 8 1/2" X 11" Cardstock [ 165626 ]](https://assets1.tamsnetwork.com/images/EC042017NF/165626s.jpg "Timid Tiger 8 1/2\" X 11\" Cardstock [ 165626 ]")
![Blueberry Bushel 8-1/2" X 11" Cardstock [ 146968 ]](https://assets1.tamsnetwork.com/images/EC042017NF/146968s.jpg "Blueberry Bushel 8-1/2\" X 11\" Cardstock [ 146968 ]")
![Gorgeous Grape 8-1/2" X 11" Cardstock [ 146987 ]](https://assets1.tamsnetwork.com/images/EC042017NF/146987s.jpg "Gorgeous Grape 8-1/2\" X 11\" Cardstock [ 146987 ]")
![Secret Sea 8 1/2" X 11" Cardstock [ 165624 ]](https://assets1.tamsnetwork.com/images/EC042017NF/165624s.jpg "Secret Sea 8 1/2\" X 11\" Cardstock [ 165624 ]")
![Basic White 8 1/2" X 11" Cardstock [ 166780 ]](https://assets1.tamsnetwork.com/images/EC042017NF/166780s.jpg "Basic White 8 1/2\" X 11\" Cardstock [ 166780 ]")
![Shimmery White Embossing Paste [ 145645 ]](https://assets1.tamsnetwork.com/images/EC042017NF/145645s.jpg "Shimmery White Embossing Paste [ 145645 ]")
![Palette Knives [ 142808 ]](https://assets1.tamsnetwork.com/images/EC042017NF/142808s.jpg "Palette Knives [ 142808 ]")
![Strawberry Slush Classic Stampin' Ink Refill [ 165282 ]](https://assets1.tamsnetwork.com/images/EC042017NF/165282s.jpg "Strawberry Slush Classic Stampin' Ink Refill [ 165282 ]")
![Crisp Cantaloupe Classic Stampin' Ink Refill [ 167670 ]](https://assets1.tamsnetwork.com/images/EC042017NF/167670s.jpg "Crisp Cantaloupe Classic Stampin' Ink Refill [ 167670 ]")
![Balmy Blue Classic Stampin' Ink Refill [ 147168 ]](https://assets1.tamsnetwork.com/images/EC042017NF/147168s.jpg "Balmy Blue Classic Stampin' Ink Refill [ 147168 ]")
![Blueberry Bushel Classic Stampin' Ink Refill [ 147176 ]](https://assets1.tamsnetwork.com/images/EC042017NF/147176s.jpg "Blueberry Bushel Classic Stampin' Ink Refill [ 147176 ]")
![Daffodil Delight Classic Stampin' Ink Refill [ 119672 ]](https://assets1.tamsnetwork.com/images/EC042017NF/119672s.jpg "Daffodil Delight Classic Stampin' Ink Refill [ 119672 ]")
![Highland Heather Classic Stampin' Ink Refill [ 147167 ]](https://assets1.tamsnetwork.com/images/EC042017NF/147167s.jpg "Highland Heather Classic Stampin' Ink Refill [ 147167 ]")
![Water & Dotted Lines 12" X 12" (30.5 X 30.5 Cm) Decorative Masks [ 167760 ]](https://assets1.tamsnetwork.com/images/EC042017NF/167760s.jpg "Water & Dotted Lines 12\" X 12\" (30.5 X 30.5 Cm) Decorative Masks [ 167760 ]")
![Paper Trimmer [ 152392 ]](https://assets1.tamsnetwork.com/images/EC042017NF/152392s.jpg "Paper Trimmer [ 152392 ]")

Don’t forget that your order can qualify you for LovenStamps Perks Points and LovenStamps Card Kits “To Go” when you shop with me!
LovenStamps Monthly Tutorials: Each month I carefully select a group of coordinating supplies – stamps, ink, papers and embellishments – and design 4 fabulous projects using only those products. You’ll love crafting these 4 projects at home! You can follow along with the LovenStamps Project Tutorial videos, or you can follow the directions in my printable PDF tutorials – available free this month with any order you place in my online Stampin Up store. May Monthly Tutorials will feature the Scenic Coast Suite Collection!
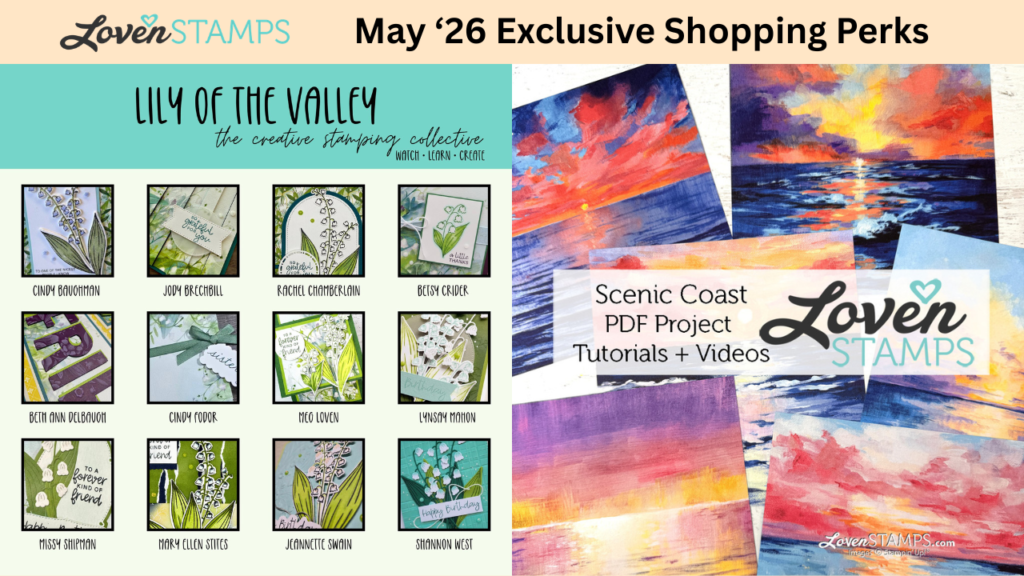
Ordering $60+ (after rewards, before shipping/tax) with me? You get two perks beyond the Monthly Tutorials PDF! First, you’ll get two ready-to-stamp project kits in the mail from me – pre-cut cardstock, dsp and embellishments featuring two of the LovenStamps Monthly Tutorial projects. Second, you’ll get free access (a $15 value) to the Creative Stamping Collective Video Class! In May the 12 project video class features the Lily of the Valley stamp and die bundle from the Stampin’ Up! May – August Catalog release.
Looking for easy-print downloadable PDF tutorials for building your card idea library? Tutorials from the LovenStamps Archive are available for purchase in the LovenStampsCardMart on Etsy.
Happy Stamping!

To Order Stampin’ Up! Products On-Line 24/7, CLICK HERE!

ALL NEW Stamping Supplies!!
- Check out all the NEW: stamps, papers and more!
- Want a little? Place an order!
- Want a lot? Order $20 or more and receive 10% in Stampin’ Rewards directly in your online shopping account! Use these Stampin Rewards on your next order.
- When you order and select me as your demonstrator: Earn 1 LovenStamps Perks Point for every $30 you order online, or $60+ orders earn LovenStamps Card Kits “To Go”!
- Want it ALL? Join my LovenStampfuls demonstrator family – and get a terrific discount on your Starter Kit, plus the orders you place as a demonstrator! Learn More
WDIBT Maker’s Club – Sign Up is OPEN!
Curious? Ready to sign up? Learn more about the “Why Did I Buy This?” Maker’s Club!
This premium monthly club includes a curated product box sent to your home each month, along with a VIP Zoom session packed with ideas on how to use the amazing things in your Maker Club Box. Stamp a lot? Stamp a little? Stamp for yourself or creating projects for events?? We welcome you to join our “Why Did I Buy This?” Maker Club! Think of it as monthly inspiration and time set aside for YOU.