That old saying, always plan what you’re going to make ahead of the live video…well, it went out the window for today’s Maker Mornings with Meg project! But I think it worked out okay – what do you think? Since there is a great sale on Ink Refills (along with paper, ink pads, cardstock, etc) right now, I wanted to share this Ombre Embossing Paste technique tutorial.
Shop the Seasonal Sale – up to 20% off stamping basics (ink, paper, envelopes, ribbons!)

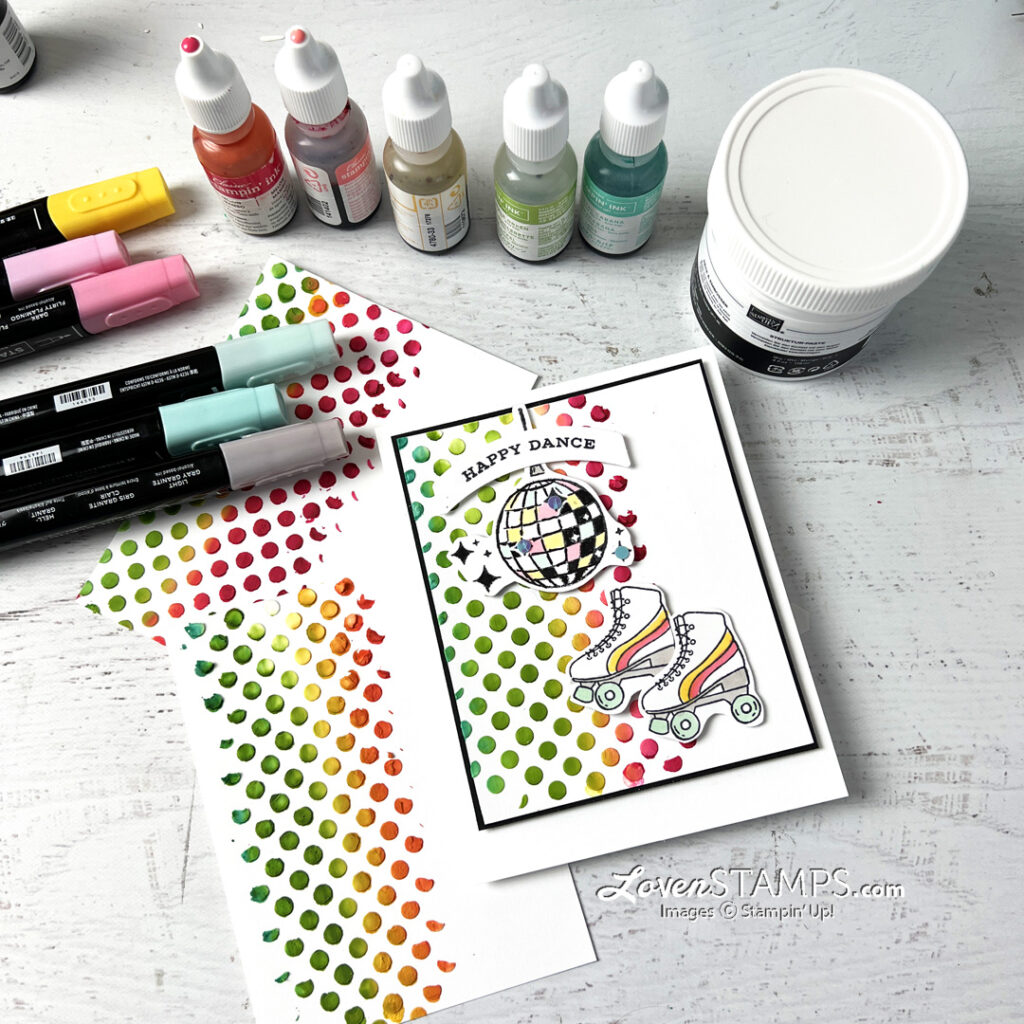
It’s been a few years since I shared this last (apparently since March 2021), but I was excited to pull out the supplies – Embossing Paste, ink refills, a decorative mask of your choice – and get some ink on paper. The Curved Occasions stamp set with its disco ball and 70’s/80’s roller skates seemed like a perfect match for the color combination I had in mind.

The steps are pretty simple for this technique, and the results are fabulous!
Ombre Embossing Paste: Technique Tutorial
Ombre is a French term meaning shaded, usually a multicolor stripe, where colors graduate from light to dark. In the context of embossing paste, it involves creating a gradient effect with the paste, which can add a unique dimension and depth to your art.
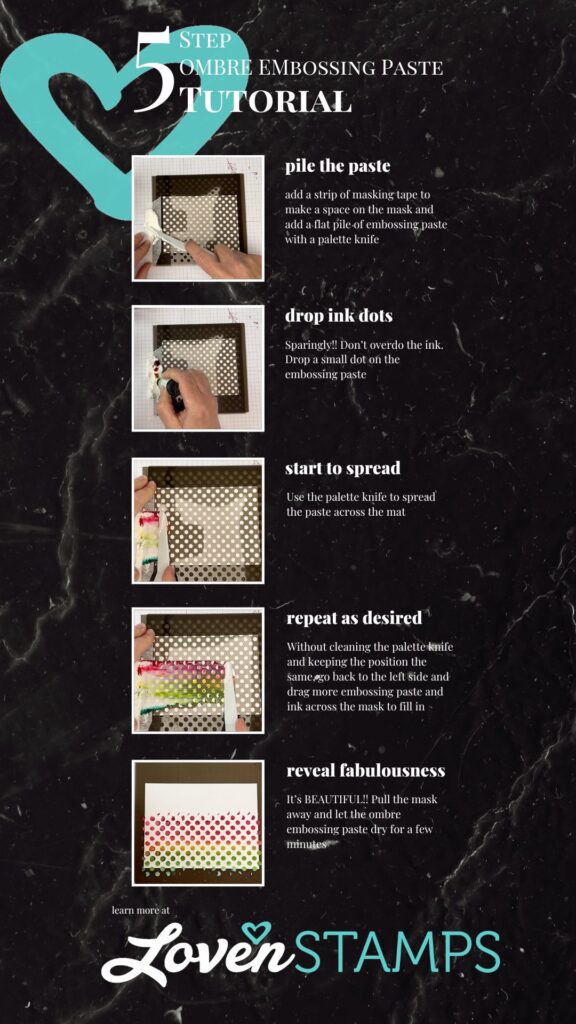
Step 1: Pile the Paste
The first step in the process is to add a strip of masking tape to make a space on the mask. Then, using a palette knife, add a flat pile of embossing paste. This is the basis for your work, so make sure it’s evenly spread and ready for the next steps.
Step 2: Drop Ink Dots
Next, you’ll want to add some color to your paste. But remember – use the ink sparingly! Don’t overdo it. Drop a small dot on the embossing paste. The color will spread and blend as you work with the paste, creating a striking ombre effect.
Step 3: Start to Spread
Once you’ve dropped the ink onto the paste, use your palette knife to spread the paste across the mat. The goal here is to distribute the color and create a gradient effect. The key to achieving a smooth ombre transition is to spread the paste evenly, making sure the color blends naturally.
Step 4: Repeat as Desired
Without cleaning the palette knife and keeping the position the same, go back to the left side and drag more embossing paste and ink across the mask to fill in. The repeating process will help to enhance the ombre effect and ensure that the color is evenly distributed throughout the paste.
Step 5: Reveal Fabulousness
Finally, it’s time to reveal your masterpiece! Carefully pull the mask away and let the ombre embossing paste dry for a few minutes. The result will be a beautiful piece of art with a stunning gradient effect. It’s a simple and fun process, but with impressive results.
Art is all about experimentation and creativity. With this tutorial, you can explore new techniques and create beautiful, unique pieces. Whether you’re a seasoned artist or a beginner, embossing paste offers a fun and accessible way to express your creativity. So why not give it a try and see where your imagination takes you?
Ready to shop?
Add items to your cart with November Host code HAV2XUUN for LovenStamps Perks Points and tutorials. **Orders over $150 should not use the hostess code since those orders qualify for Stampin Rewards selected at the time of the order. Don’t worry, you’ll still qualify LovenStamps Perks Points and tutorials!
Looking for easy-print downloadable PDF tutorials for building your card idea library? Tutorials from the LovenStamps Archive are available for purchase in the LovenStampsCardMart on Etsy.
Rainbow Ombre Embossing Paste – Stampin’ Up! Tutorial
View below or use the link to view directly on my LovenStamps YouTube channel. Don’t forget to subscribe while you’re there
Add items to your cart with November hostess code HAV2XUUN for LovenStamps Perks Points and Tutorials. **Orders over $150 should not use the hostess code since those Stampin’ Up! orders qualify for Stampin Rewards selected at the time of the order. Don’t worry, you’ll still qualify LovenStamps Perks Points and tutorials!
Ombre Embossing Paste – Stampin’ Up! Supplies you’ll want for stamping at home:
Use Meg’s for Stamping Supplies (Host code HAV2XUUN)
Product List")
")


Don’t forget that your order can qualify you for LovenStamps Perks Points and LovenStamps Card Kits “To Go” when you use a hostess code! Check out the details on earning Perks Points and Card Kits with your order. November Winter Owls Bundle Tutorials are available through November 31.

Happy Stamping!

To Order Stampin’ Up! Products On-Line 24/7, CLICK HERE!

Online Exclusives!
- You won’t find these products in any catalog, which means you can always find fresh, never-before-seen products to spark your creativity and expand your crafting collection. All from the convenience of my online store.
- NEW Online Exclusives will release several times throughout the year – the NEWEST products on November 7!
- Interested in early access? Pre-Order access is a perk of being a demonstrator! I’d love to help you get started – and to help you take advantage of this fun early ordering perk! Check out the Starter Kit to begin.
- Shop now

Shop the NEW Catalog and Colors!
- Up to 60% off stamp, papers and more!
- Want a little? Place an order!
- When you order: use November Hostess Code (HAV2XUUN). Earn 1 LovenStamps Perks Point for every $25 you order online, plus LovenStamps Card Kits “To Go” with an order of $50 or more!
- Want a lot? Host a party – or be your own hostess with a large online order! (Stampin’ Rewards begin at $150 in orders – don’t use the hostess code for orders over $150, since you’ll pick your own Rewards with your order)
- Want it ALL? Join my LovenStampfuls demonstrator family – and get a terrific discount on your Starter Kit, plus the orders you place as a demonstrator! AND early access to new products like new colors, stamps and accessories!