
Have you been watching the excitement coming from Salt Lake City this week? I’ve been here for the Stampin’ Up! OnStage 2016 event – 3 days of stamping inspiration and excitement. But that’s a whole other post. And since our flights were delayed by a day, I happily have time to get this one written for you!
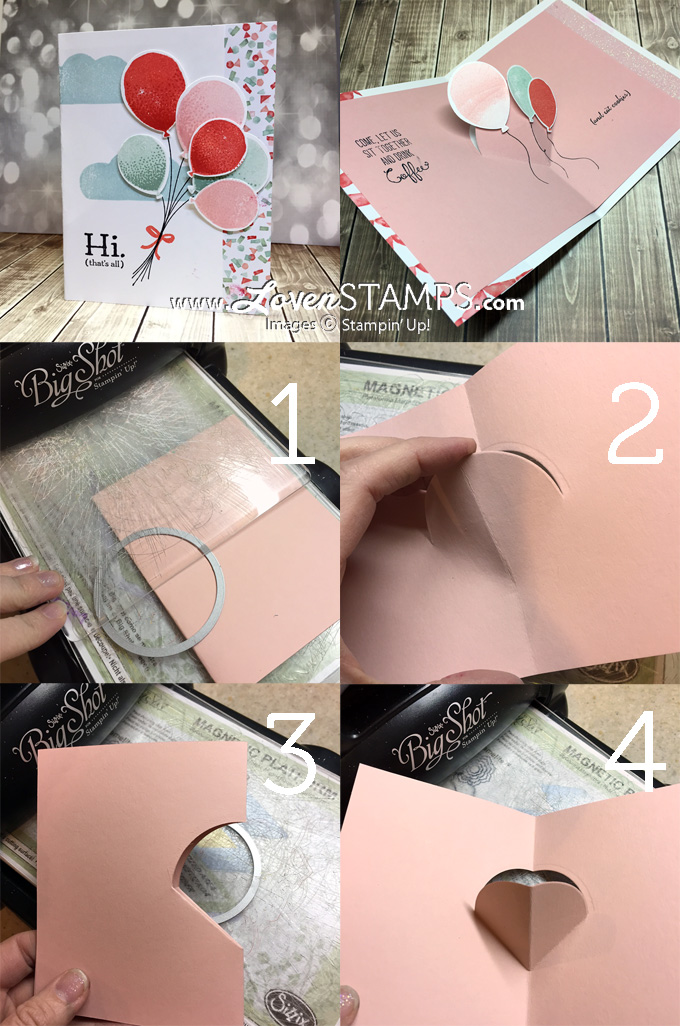
My FIRST priority was to share this exciting card with you. It’s my Snow Cone Pop-Up Card! My club members got to make this Balloon Celebration card at our March club session, but I kept it secret until now so that I could share the technique with 1300 Stampin’ Up! demonstrators yesterday at OnStage 2016 here in Salt Lake City.

I love cards that move or have a special fold, so this one is a treat. Be sure to check the video tutorial to learn how to create your own Snow Cone Pop-Up Card, and then pin the graphic directions below so that you’ll be able to find them when you’re ready to create!

Can’t see the video correctly? No problem, click here to view directly. Don’t forget to subscribe to my YouTube channel while you’re there!
Love written directions? I’m happy to help!
Snow Cone (Half-Circle) Pop-Up Card Directions
- Fold the 5” x 7-3/4” card stock in half and place a circle die on the fold.
- Pic 1: Line up the Big Shot cutting place halfway across the circle die and run through.
- Pic 2: Pull the die cut circle down so the ‘cone’ point is below the ends of the half-circle – a “V” shape should form (looks just like a snow cone!).
- Pic 3: Fold card in half.
- Pic 4: Decorate your pop up panel and use Fast Fuse or other strong adhesive to add inside the folded half-sheet card.
The pop-up panel is designed to fit inside a regular 5-1/2″ x 8-1/2″ card base – so design whatever you love for the card front, and add your decorations inside to coordinate!
I had so much fun presenting on stage at OnStage2016 here in Salt Lake City – despite the slightly crazy microphone incident…more on that in a future post – ha! Be sure to check back AFTER 2 pm central time on Monday, April 18 – that’s when I can share the actual projects that I presented on stage. I used a brand new sneak peek stamp set (coming June 1 in the new catalog), so I can’t share until the catalog is released to demonstrators around the world.

And if you’re REALLY excited about the new catalog, you should know that demonstrators get to see it online Monday, April 18 AND we get to place pre-orders for selected new products (like the upcoming 2016-2018 In Colors!) beginning on May 3.
Can’t wait til June 1 to order as a customer? Ha! I hear you! The simple solution is to join my Stampin’ Up! family as a LovenStampfuls demonstrator. Not only will you get to see the new catalog first, but you’ll also get to pre-order first AND your purchases will be with your demonstrator discount! And I can assure you…you’re going to have a loooooong Wish List when you do finally see the upcoming catalog.
Let me know if you have questions about joining my LovenStampfuls community (or click here for more details), and if you make your own Snow Cone Pop-Up Card, I’d love to see it!
Product List


Happy Stamping!
 To Order Stampin’ Up! Products On-Line 24/7, CLICK HERE!

- Browse online and see the NEW products!
- Love one of the bundles? Get it free with Stampin’ Rewards (begins at $150 in product)
- Wish List long? Get a discount on your purchases – with a Demo Starter Kit!
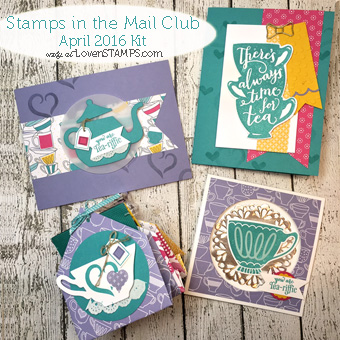 Stamps in the Mail Club with Meg
Sign up today for your April Kit!
Includes the NEW A Nice Cuppa stamp set, 2 Classic Ink Pads, plus supplies for making 4 fabulous projects!
*BEST VALUE Option – Add the coordinating Cups & Kettle Framelits Dies at a 30% discount!
Great job presenting at On Stage!
Thanks, Meg, for sharing your tutorial! I was hoping that it would show up on the SU! website or somewhere! (Your should see my pitiful scribbles in my notebook from OnStage where I tried to make notes so I could duplicate it!) And, you did a wonderful job presenting it at OnStage! :)
Lol – it was a lot of information to cover in a short time at #OnStage2016 – I figured a reminder might be helpful :)