Did you see my video tutorial on making Shaker Cards from your die-cut rubber scraps? Here is another example–this isn’t the easiest stamp set for this technique though…I’d recommend starting your Shaker Card with a more rounded image, like the Sock Monkey in my video tutorial.

And if you want to see the step-by-step tutorial, here are the photos of my project as I was working on it…
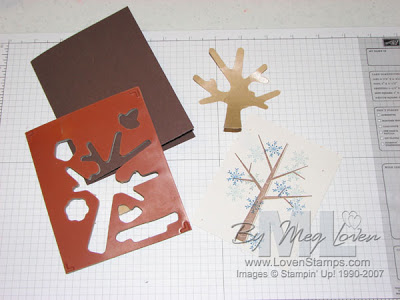
Start with the stamped image (the tree), the rubber from the die-cut stamp set, the card and the backing from the tree stamp (if you still have it).

Trace the tree backing paper onto the layer that will cover the ‘guts’ guts of your shaker card. Cut out the shape, leaving about 1/8″ edge between the line and where you cut–you don’t want the hole to be too big or else the ‘guts’ of the shaker box will show.

Carefully use your Craft & Rubber scissors to trim the rubber so that it will fit under the ‘pretty’ top layer of your card.

Peel off the rubber from the foam and press the foam down around the stamped tree. Add some microbeads or glitter to the tree.

Peel off the paper layer and lay down a piece of Cello Bag to hold the beads in place. If there are any areas where the foam is narrow, consider using Crystal Effects to be sure the foam is sealed to the cardstock and the cello bag… you don’t want your microbeads to leak out!
Then just assemble with the top layers and admire :-)